
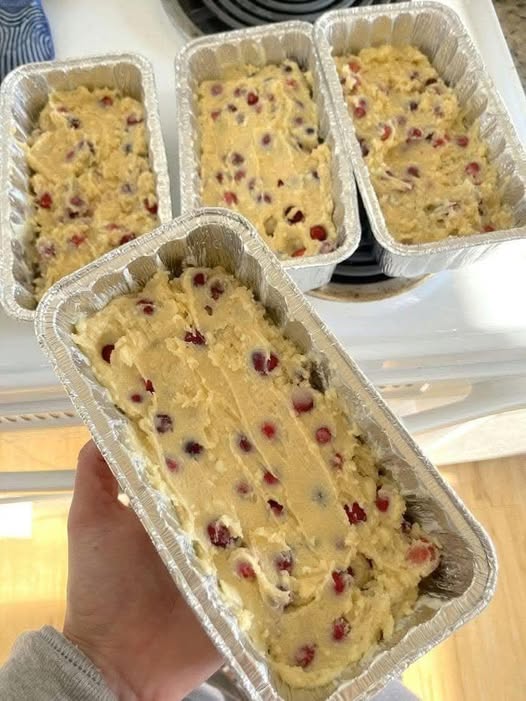
Homemade Cranberry Loaf Bread
Description
This Homemade Cranberry Loaf Bread is a soft, moist, buttery quick bread filled with bright red cranberries in every slice. It has a tender, slightly sweet crumb with little bursts of tart cranberry flavor that make every bite delicious.
The batter is simple to prepare, requires no yeast, and can be baked in regular loaf pans or smaller disposable foil pans. It is perfect for breakfast, afternoon coffee, holiday gatherings, or sharing with neighbors and friends.
The photograph appears to show cranberry bread batter divided between several small loaf pans. The exact original ingredients are not visible, so this is a homemade version inspired by the picture.
Recipe Information
-
Preparation Time: 15 minutes
-
Baking Time: 40–50 minutes for a standard loaf
-
Total Time: Approximately 1 hour
-
Servings: 8–10 slices per standard loaf
-
Difficulty: Easy
-
Cooking Method: Oven baking
Ingredients
-
2 cups all-purpose flour
-
¾ cup granulated sugar
-
½ cup unsalted butter, softened
-
2 large eggs
-
½ cup milk
-
1½ cups fresh or frozen cranberries
-
1½ teaspoons baking powder
-
½ teaspoon baking soda
-
1 teaspoon vanilla extract
-
1 tablespoon orange zest (optional)
-
¼ teaspoon salt
Instructions
Step 1: Prepare the oven and pans
Preheat the oven to 350°F (175°C). Grease a standard 9-by-5-inch loaf pan with butter or nonstick cooking spray. You can also line the pan with parchment paper for easier removal.
If using smaller foil loaf pans, lightly grease each one.
Step 2: Prepare the dry ingredients
In a medium-sized bowl, combine the flour, baking powder, baking soda, and salt. Whisk everything together until evenly mixed.
Set the bowl aside while you prepare the wet ingredients.
Step 3: Cream the butter and sugar
In a large mixing bowl, beat the softened butter and sugar together until light and fluffy. This usually takes about 2–3 minutes with an electric mixer.
Creaming the butter and sugar helps create a tender texture.
Step 4: Add the eggs and vanilla
Add the eggs one at a time, mixing well after each addition. Stir in the vanilla extract and orange zest if using.
The mixture should look smooth and creamy.
Step 5: Combine the wet and dry ingredients
Gradually add the dry ingredients to the butter mixture, alternating with the milk.
Begin with some of the flour mixture, add a little milk, and continue until everything is combined.
Mix just until the flour disappears. Avoid overmixing because this can make the bread dense.
Step 6: Fold in the cranberries
Gently fold the cranberries into the batter using a spatula.
If using frozen cranberries, add them directly from the freezer without thawing. Tossing them with a teaspoon of flour before folding them in can help distribute them throughout the batter.
Step 7: Fill the loaf pans
Transfer the batter into the prepared loaf pan. Spread it evenly with a spatula.
Fill smaller foil pans approximately two-thirds full to allow room for the bread to rise.
Step 8: Bake until golden
Bake a standard loaf for approximately 40–50 minutes, or until a toothpick inserted into the center comes out clean or with a few moist crumbs.
Smaller loaf pans may take approximately 25–35 minutes, depending on their size. Begin checking early because smaller loaves bake faster.
Step 9: Cool the bread
Remove the pans from the oven and allow the bread to cool for approximately 10–15 minutes.
Carefully remove the loaves from the pans and transfer them to a wire rack to cool completely before slicing.
Step 10: Slice and serve
Cut into thick slices and serve plain, with butter, or alongside a warm cup of coffee or tea.
Notes
-
Fresh cranberries provide a wonderful tart flavor.
-
Frozen cranberries can be used without thawing.
-
Dried cranberries also work, but the bread will be sweeter and less juicy.
-
Orange zest is optional but complements cranberries beautifully.
-
Do not overmix the batter.
-
Smaller loaf pans require less baking time.
-
Allow the bread to cool before slicing to help it hold its shape.
Helpful Tips for Perfect Cranberry Bread
-
Use room-temperature ingredients: Butter, eggs, and milk combine more easily when they are not cold.
-
Keep the cranberries evenly distributed: Fold them in gently rather than stirring vigorously.
-
Avoid overfilling pans: Leave room for the batter to rise.
-
Check the center: The outside may look golden before the middle is completely baked.
-
Prevent excessive browning: If the top browns too quickly, loosely cover it with foil.
-
Add orange flavor: Orange zest gives the bread a fresh, festive aroma.
-
Cool before wrapping: Warm bread creates condensation, which can make the crust soggy.
Optional Variations
Cranberry Orange Bread: Add 1 tablespoon orange zest and replace 2 tablespoons of the milk with fresh orange juice.
Cranberry Walnut Bread: Fold in ½ cup chopped walnuts for a little crunch.
Lemon Cranberry Bread: Add 1 tablespoon lemon zest for a bright citrus flavor.
White Chocolate Cranberry Bread: Add ½ cup white chocolate chips for a sweeter dessert-style loaf.
Cinnamon Cranberry Bread: Add ½ teaspoon ground cinnamon to the dry ingredients.
Serving Suggestions
This homemade bread tastes wonderful served with:
-
Softened butter
-
Cream cheese
-
Greek yogurt
-
Fresh fruit
-
Coffee or tea
-
A light drizzle of vanilla glaze
It also makes a thoughtful homemade gift. Wrap a completely cooled mini loaf in parchment paper or place it in a food-safe gift bag.
Storage Instructions
Room Temperature: Store the completely cooled bread in an airtight container for up to 2 days.
Refrigerator: Keep it in an airtight container for up to 5–7 days.
Freezer: Wrap individual slices or whole loaves tightly and freeze for up to 2–3 months for best quality.
Reheating: Warm individual slices in the microwave for approximately 10–15 seconds or toast lightly before serving.
Nutritional Information
Estimated nutrition per slice, assuming one standard loaf cut into 10 slices:
-
Calories: 230–260
-
Protein: 4–5g
-
Carbohydrates: 34–38g
-
Fat: 9–11g
-
Fiber: 1–2g
-
Sugar: 15–18g
Values vary depending on the size of the loaf, ingredients, and number of slices.
Potential Benefits
1. Cranberries contain antioxidants
Cranberries provide naturally occurring plant compounds, including polyphenols, which have antioxidant properties.
2. Provides energy
Flour and sugar supply carbohydrates that the body uses for energy.
3. Contains some essential nutrients
Eggs and milk contribute protein, vitamin B12, and other nutrients.
4. Homemade ingredient control
Preparing bread at home allows you to adjust sweetness, choose ingredients, and control portion sizes.
Frequently Asked Questions
Q1: Can I use frozen cranberries?
Yes. Add them directly to the batter while frozen. There is no need to thaw them first.
Q2: Can I use dried cranberries?
Yes. Use approximately 1 cup of dried cranberries. You can soak them briefly in warm water and drain them before adding if you prefer a softer texture.
Q3: Why is my cranberry bread dense?
Overmixing, too much flour, or expired baking powder can make the bread dense. Measure the flour carefully and mix only until combined.
Q4: Can I make mini cranberry loaves?
Absolutely. Divide the batter between greased mini loaf pans and begin checking for doneness after approximately 25 minutes.
Q5: Can I make this bread without orange zest?
Yes. Vanilla alone gives the bread a lovely flavor, so orange zest is completely optional.
Q6: How do I know when the bread is ready?
Insert a toothpick into the center. It should come out clean or with a few moist crumbs, but not wet batter.
Q7: Can I prepare the batter ahead of time?
For the best rise and texture, bake the batter soon after mixing because the baking powder and baking soda begin working once the wet and dry ingredients are combined.
Final Thoughts
Homemade Cranberry Loaf Bread is a beautiful, comforting treat with a soft buttery texture and colorful cranberries throughout. It is easy to prepare, makes a lovely homemade gift, and is perfect for sharing with family, friends, and neighbors.
Bake several mini loaves for holiday gatherings or make one large loaf to enjoy throughout the week. One slice is often enough to make someone ask for the recipe!