
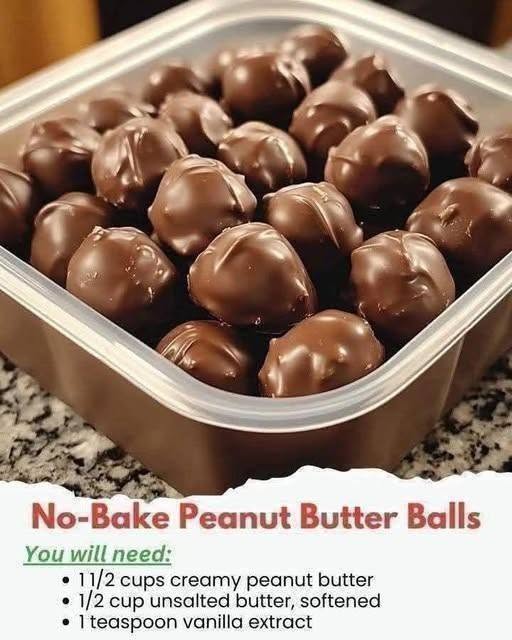
No-Bake Peanut Butter Balls Recipe
Description
No-Bake Peanut Butter Balls are a delicious, creamy, and easy homemade treat made with peanut butter, softened butter, vanilla, and a few simple ingredients. They have a rich peanut butter flavor and a smooth texture that makes them perfect for holidays, parties, dessert trays, or everyday snacking.
The best part is that you do not need an oven to make them. Simply mix the ingredients, roll the mixture into small balls, chill until firm, and enjoy. You can also dip them in melted chocolate for a sweet chocolate coating that pairs beautifully with the peanut butter center.
This recipe is easy enough for beginners and is a great choice when you want a homemade dessert without complicated baking steps.
Recipe Information
-
Prep Time: 20 minutes
-
Chilling Time: 30–60 minutes
-
Total Time: 50–80 minutes
-
Servings: About 24 balls
-
Course: Dessert, Snack
-
Cuisine: American
-
Cooking Method: No-bake
-
Difficulty: Easy
Ingredients
For the Peanut Butter Mixture
-
1½ cups creamy peanut butter
-
½ cup unsalted butter, softened
-
1 teaspoon vanilla extract
-
3–4 cups powdered sugar, added gradually
Optional Chocolate Coating
-
1½ cups chocolate chips or chopped chocolate
-
1 teaspoon coconut oil, optional, for a smoother coating
Note: The supplied ingredient list included the peanut butter, butter, and vanilla. Powdered sugar is a common addition that helps the mixture hold its shape, while chocolate coating is optional.
Instructions
Step 1: Prepare the Peanut Butter Mixture
Add the creamy peanut butter and softened unsalted butter to a large mixing bowl. Beat with a hand mixer or stir firmly with a wooden spoon until the mixture becomes smooth and creamy.
Add the vanilla extract and mix again until evenly combined.
Step 2: Add the Powdered Sugar
Add the powdered sugar one cup at a time, mixing well after each addition. Start with 3 cups and add more as needed until the mixture becomes thick enough to roll into balls without sticking excessively to your hands.
The mixture should be soft but firm enough to hold its shape. If it is too sticky, add a little more powdered sugar.
Step 3: Shape the Balls
Scoop out approximately 1 tablespoon of the mixture for each ball. Roll it between your palms until smooth and round.
Place the balls on a baking sheet lined with parchment paper. Leave a little space between each ball so they are easy to handle.
Step 4: Chill Until Firm
Place the baking sheet in the refrigerator for 30–60 minutes, or until the peanut butter balls feel firm.
Chilling makes the balls easier to dip in chocolate and helps them keep their shape.
Step 5: Prepare the Chocolate Coating (Optional)
Place the chocolate chips in a microwave-safe bowl. Heat in 20–30 second intervals, stirring between each interval until the chocolate is melted and smooth.
If desired, stir in the coconut oil to make the coating easier to dip. Avoid overheating the chocolate.
Step 6: Dip the Peanut Butter Balls
Use a fork or dipping tool to lower each chilled peanut butter ball into the melted chocolate. Lift it out, allow excess chocolate to drip off, and return it to the parchment-lined baking sheet.
For a decorative finish, drizzle a little extra melted chocolate over the top.
Step 7: Chill and Serve
Return the coated balls to the refrigerator for 15–20 minutes, or until the chocolate has set.
Serve chilled or slightly softened. Enjoy these creamy peanut butter treats with coffee, tea, or a glass of milk.
Recipe Notes
-
Use creamy peanut butter: A smooth variety gives the balls a consistent texture. Natural peanut butter that separates may make the mixture softer or oilier.
-
Soften the butter: Softened butter mixes more easily than cold butter.
-
Add powdered sugar gradually: Different peanut butter brands have different consistencies, so you may not need the full amount.
-
Chill before dipping: Cold balls are easier to coat and less likely to fall apart.
-
Chocolate is optional: The peanut butter balls taste delicious on their own.
-
Make them smaller or larger: Adjust the size to suit your dessert tray, remembering that larger balls may need additional chilling time.
Helpful Tips for the Best Results
1. Measure the ingredients carefully. Too much peanut butter can make the mixture soft, while too much powdered sugar can make it dry and crumbly.
2. Avoid adding all the sugar at once. Mix gradually and check the consistency as you go.
3. Use parchment paper. It prevents sticking and makes transferring the finished balls easier.
4. Keep the mixture cool. If the mixture becomes too soft while rolling, refrigerate it for 10–15 minutes before continuing.
5. Melt chocolate gently. Stir frequently and stop heating as soon as the chocolate is smooth.
6. Decorate for special occasions. Add a small drizzle of contrasting chocolate or a light sprinkle of finely chopped peanuts before the coating sets.
Storage Instructions
-
Refrigerator: Store the peanut butter balls in an airtight container for up to 1–2 weeks.
-
Freezer: Freeze in a sealed, freezer-safe container for up to 2–3 months for best quality.
-
Thawing: Transfer frozen balls to the refrigerator and allow them to thaw before serving.
Because this recipe contains butter, refrigeration is recommended. If you stack the balls, place parchment paper between the layers to prevent sticking.
Nutritional Information
Estimated nutrition per ball, assuming 24 balls are made with the listed ingredients, powdered sugar, and optional chocolate coating. Actual values depend on the brands and quantities used.
-
Calories: 180–230
-
Protein: 3–5 g
-
Carbohydrates: 15–22 g
-
Fat: 12–16 g
-
Sugar: 12–18 g
These treats are energy-dense because of the peanut butter, butter, powdered sugar, and optional chocolate. For more accurate values, calculate nutrition using the specific products and quantities you use.
Benefits of This Recipe
-
Easy preparation: No oven or baking experience is needed.
-
Simple ingredients: The recipe uses common pantry ingredients.
-
Peanut butter flavor: Peanut butter provides protein and unsaturated fats.
-
Make-ahead friendly: Prepare the balls in advance for parties, holidays, or busy days.
-
Customizable: Choose your favorite chocolate, adjust the size, or leave the balls uncoated.
These are dessert treats rather than a low-sugar food. If you have a peanut allergy, avoid this recipe and choose an appropriate alternative.
Frequently Asked Questions
1. Why is my peanut butter mixture too sticky?
The mixture may need more powdered sugar or additional chilling. Add powdered sugar a little at a time until it is firm enough to roll.
2. What if the mixture is too dry?
Add a small amount of peanut butter and mix again until the texture becomes smooth and workable.
3. Can I make these without chocolate?
Yes. Simply roll the mixture into balls and chill until firm. They are delicious without a coating.
4. Can I use crunchy peanut butter?
Yes. Crunchy peanut butter adds texture, although the balls will not have the same smooth finish.
5. Can I make these ahead of time?
Absolutely. Prepare them several days in advance and keep them refrigerated in an airtight container until you are ready to serve.
6. Can I use salted butter?
Yes, but the finished treats may taste saltier. If using salted butter, taste the mixture before adding any extra salt.
7. How do I stop the chocolate from cracking?
Let the chocolate coating set in the refrigerator without exposing the balls to sudden temperature changes. A little coconut oil can help make the coating smoother, though it does not guarantee that cracking will never occur.
8. Can I make them without powdered sugar?
Powdered sugar helps bind the mixture and gives it a sweeter, firmer texture. Alternatives may work, but the ingredient ratios and final texture will change.
Final Thoughts
No-Bake Peanut Butter Balls are a simple, sweet, and satisfying homemade treat that you can prepare without turning on the oven. The creamy peanut butter center tastes wonderful on its own, while an optional chocolate coating makes each bite feel extra special.
Mix the ingredients, roll the balls, chill until firm, and enjoy. Keep a batch in the refrigerator for an easy dessert, or make them ahead for holidays, parties, and family gatherings.