
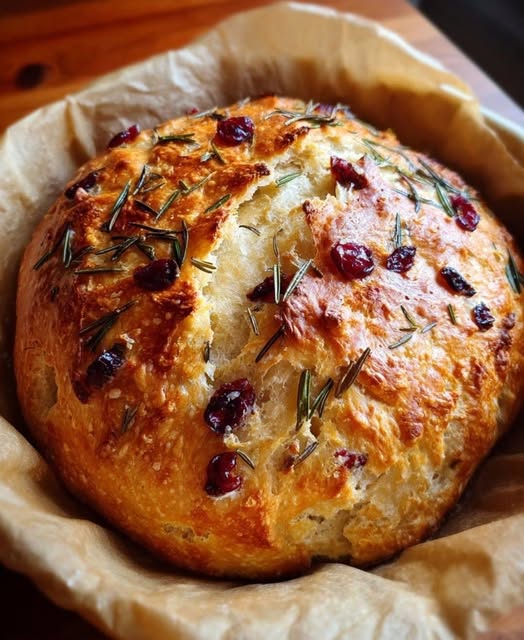
No-Knead Rosemary Cranberry Bread with Olive Oil & Sea Salt
Description
No-Knead Rosemary Cranberry Bread with Olive Oil and Sea Salt is a beautiful homemade artisan bread with a crispy golden crust, soft and chewy interior, sweet-tart dried cranberries, and fragrant fresh rosemary.
This rustic bread is surprisingly easy to prepare because it requires no kneading. Simply mix the ingredients, allow the dough to rise, shape it gently, and bake until the crust becomes beautifully golden and crisp.
The dried cranberries add little bursts of sweetness, while rosemary brings an earthy, aromatic flavor. Olive oil adds richness and helps create a tender crumb, and a sprinkle of flaky sea salt gives the crust a delicious savory finish.
This bread is perfect for holiday dinners, Thanksgiving gatherings, Christmas celebrations, weekend baking, or everyday meals. Serve it warm with olive oil for dipping, alongside soup, or toasted with butter.
Recipe Information
-
Prep Time: 15 minutes
-
Rising Time: 12–18 hours
-
Second Rise: 30–45 minutes
-
Cook Time: 40–45 minutes
-
Total Time: Approximately 13–19 hours
-
Servings: 10–12 slices
-
Course: Bread / Side Dish
-
Cuisine: Artisan-Inspired
-
Cooking Method: Oven Baked
-
Difficulty: Easy
Ingredients
-
3 cups (375 g) all-purpose flour or bread flour
-
1½ teaspoons salt
-
½ teaspoon instant yeast
-
1½ cups (360 ml) lukewarm water
-
¾ cup dried cranberries
-
1½ tablespoons fresh rosemary, finely chopped
-
1 tablespoon olive oil, plus extra for brushing
-
1 tablespoon honey (optional)
-
1 teaspoon flaky sea salt for topping
Instructions
Step 1: Prepare the Dry Ingredients
In a large mixing bowl, combine the flour, salt, and instant yeast. Stir with a wooden spoon until evenly mixed.
Make sure the yeast is distributed throughout the flour so the dough rises evenly.
Step 2: Add the Flavorful Ingredients
Add the dried cranberries and finely chopped fresh rosemary. Stir gently to distribute them throughout the flour mixture.
Pour in the lukewarm water and olive oil. Add honey if you prefer a slightly sweeter flavor.
Step 3: Mix the Dough
Stir everything together with a wooden spoon until a sticky, shaggy dough forms.
The dough should look rough and uneven. It does not need to be smooth, and there is no need to knead it.
If the mixture appears extremely dry, add a teaspoon of water at a time. If it seems sticky, that is normal for this type of artisan bread.
Step 4: Cover and Let the Dough Rise
Cover the bowl tightly with plastic wrap or a clean kitchen towel.
Leave the dough at room temperature for approximately 12–18 hours, depending on the temperature of your kitchen.
During this time, the dough will slowly ferment, develop flavor, and become bubbly and airy.
The dough should look noticeably larger and have small bubbles across its surface when ready.
Step 5: Prepare the Dough for Baking
Lightly flour a clean work surface. Carefully transfer the risen dough onto it using a spatula.
Gently fold the edges toward the center a few times to create a rounded shape.
Avoid pressing or handling the dough too aggressively because you want to preserve the air bubbles that developed during fermentation.
Step 6: Allow a Second Rise
Place the dough seam-side down on a piece of parchment paper.
Cover loosely with a clean kitchen towel and allow it to rest for approximately 30–45 minutes.
Meanwhile, prepare your oven and baking equipment.
Step 7: Preheat the Oven and Dutch Oven
Place a Dutch oven with its lid inside the oven. Preheat to 450°F (230°C) for approximately 30 minutes.
Heating the Dutch oven before baking helps create the intense heat needed for a beautiful artisan-style crust.
Use oven mitts when handling the hot cookware.
Step 8: Prepare the Bread for Baking
Carefully remove the hot Dutch oven from the oven.
Lift the dough using the parchment paper and place it inside the Dutch oven.
Brush the top lightly with olive oil and sprinkle with flaky sea salt.
If desired, make a shallow cut across the top using a sharp bread lame or knife to help control expansion during baking.
Step 9: Bake Covered
Cover the Dutch oven with its lid and bake for approximately 30 minutes.
The covered environment traps steam, helping the bread expand and develop a beautiful crust.
Step 10: Bake Uncovered
Remove the lid carefully and continue baking for another 10–15 minutes.
The bread should develop a deep golden-brown crust. If you prefer a lighter crust, check it a few minutes earlier.
Step 11: Cool Before Slicing
Remove the bread from the Dutch oven and transfer it to a wire cooling rack.
Allow it to cool for at least 45–60 minutes before slicing.
This resting period helps the interior finish setting and prevents the bread from becoming gummy.
Step 12: Serve and Enjoy
Slice the cooled bread with a serrated bread knife.
Serve with olive oil, butter, soft cheese, or your favorite soup. Enjoy the combination of sweet cranberries, aromatic rosemary, and savory sea salt.
Helpful Recipe Notes
-
Bread flour creates a chewier texture, while all-purpose flour produces a slightly softer loaf.
-
Use instant yeast or active dry yeast. If using active dry yeast, dissolve it in the lukewarm water first.
-
Avoid using hot water because excessive heat can damage the yeast.
-
The dough should be sticky rather than firm.
-
Long fermentation develops flavor and helps create the bread’s airy texture.
-
Use unsweetened dried cranberries if you prefer less added sugar.
-
Fresh rosemary provides the strongest aroma, but dried rosemary can also be used in a smaller quantity.
-
A Dutch oven is ideal, but an oven-safe covered baking pot can also work.
-
Let the bread cool completely before storing.
Tips for Perfect Rosemary Cranberry Bread
1. Measure Flour Correctly: Too much flour can make the bread dense. Weighing the flour is the most reliable method.
2. Use Lukewarm Water: Water that feels comfortably warm helps activate the yeast without damaging it.
3. Be Patient with Rising: Slow fermentation creates a more developed flavor and an airy interior.
4. Don’t Knead the Dough: Simply mix until the ingredients come together. The long resting time develops the dough structure.
5. Chop Rosemary Finely: Smaller pieces distribute more evenly and prevent large woody pieces in the bread.
6. Preheat the Dutch Oven: A hot Dutch oven helps the dough rise quickly and develop a crisp crust.
7. Cool Before Cutting: Cutting too early can make the inside gummy.
8. Add Sea Salt at the End: Flaky sea salt gives the finished crust a lovely savory crunch.
Serving Suggestions
This rosemary cranberry bread is wonderfully versatile and pairs with both sweet and savory foods.
-
Serve with extra-virgin olive oil and balsamic vinegar.
-
Pair with creamy tomato soup.
-
Serve alongside roasted chicken or turkey.
-
Enjoy with a cheese board featuring Brie or goat cheese.
-
Toast slices and spread with butter.
-
Serve with scrambled eggs for breakfast.
-
Pair with roasted vegetables.
-
Use slices for festive holiday sandwiches.
For a beautiful appetizer, cut the bread into small slices and serve with whipped feta or soft goat cheese.
Recipe Variations
Orange Rosemary Cranberry Bread: Add 1 teaspoon orange zest to the dough for a bright citrus aroma.
Walnut Cranberry Bread: Add ½ cup chopped walnuts for extra crunch.
Honey Rosemary Bread: Increase the honey to 2 tablespoons for a slightly sweeter loaf.
Garlic Rosemary Bread: Add 2 minced garlic cloves for a more savory flavor.
Whole Wheat Version: Replace up to 1 cup of the all-purpose flour with whole wheat flour. You may need a little extra water.
Cheesy Cranberry Bread: Add ½ cup shredded Parmesan or Gruyère for a savory, cheesy variation.
Storage and Reheating
Room Temperature: Store completely cooled bread in a paper bag or bread container for up to 2 days. Avoid sealing warm bread in plastic because trapped moisture can soften the crust.
Refrigerator: Refrigeration is generally not recommended for artisan bread because it can make the bread stale faster.
Freezer: Slice the cooled loaf and place parchment paper between slices. Store in a freezer-safe bag for up to 2–3 months.
Reheating: Warm slices in a toaster or toaster oven until lightly crisp.
Whole Loaf: Reheat in a 350°F (175°C) oven for approximately 8–10 minutes to refresh the crust.
Estimated Nutritional Information
Approximate values per slice, assuming 12 slices:
-
Calories: 160–180
-
Protein: 4–5 g
-
Carbohydrates: 31–34 g
-
Fat: 2–3 g
-
Fiber: 1–2 g
-
Sugar: 5–7 g
-
Sodium: 250–300 mg
Values depend on the flour, cranberry brand, honey, and portion size.
Potential Benefits
1. Provides Energy: Flour supplies carbohydrates that the body uses as an energy source.
2. Contains Antioxidant Compounds: Cranberries contain naturally occurring plant compounds, including polyphenols.
3. Adds Flavor Without Heavy Sauces: Rosemary provides a fragrant herbal flavor, making the bread delicious with simple olive oil or light toppings.
4. Includes Unsaturated Fats: Olive oil provides predominantly monounsaturated fats, which can be part of a balanced eating pattern.
5. Provides Some Dietary Fiber: Flour and dried cranberries contribute fiber, although the amount depends on the ingredients used.
6. Homemade Ingredient Control: Preparing bread at home allows you to adjust the salt, sweetener, flour type, and quantity of dried cranberries.
Questions and Answers (Q&A)
Q1: Why is this bread called no-knead bread?
It is called no-knead bread because the dough develops its structure during a long resting period rather than through traditional hand kneading.
Q2: Can I use dried rosemary instead of fresh?
Yes. Use approximately 1–1½ teaspoons dried rosemary in place of 1½ tablespoons fresh rosemary.
Q3: Can I use active dry yeast?
Yes. Dissolve the active dry yeast in the lukewarm water before mixing it with the flour.
Q4: Why is my dough so sticky?
No-knead bread dough has relatively high hydration, so stickiness is normal. Use lightly floured hands when shaping it.
Q5: Can I make this bread without a Dutch oven?
Yes. Use a suitable oven-safe covered pot. Alternatively, bake on a preheated baking sheet and create steam in the oven using a separate oven-safe pan of hot water.
Q6: Can I use fresh cranberries?
Dried cranberries are recommended because fresh cranberries contain more moisture and have a much sharper flavor. If using fresh cranberries, adjust the dough carefully.
Q7: Can I prepare the dough overnight?
Yes. Overnight fermentation is ideal for this recipe. Keep the covered dough at a suitable room temperature and refrigerate it if your kitchen is particularly warm or the dough rises too quickly.
Q8: Why is my bread dense?
Possible reasons include inactive yeast, too much flour, insufficient rising time, or handling the dough too aggressively.
Q9: How do I get a crispy crust?
Bake in a thoroughly preheated Dutch oven, then remove the lid for the final 10–15 minutes.
Q10: Can I freeze this bread?
Yes. Cool completely, slice, and freeze in an airtight freezer-safe bag. Toast slices directly from frozen when needed.
Final Thoughts
No-Knead Rosemary Cranberry Bread with Olive Oil and Sea Salt is a beautiful homemade artisan loaf that combines sweet cranberries, fragrant rosemary, and a crisp, savory crust.
Its simple mixing method makes it approachable even for beginner bakers. With a little patience during fermentation, you can create a bakery-style loaf without complicated equipment or hours of kneading.
Serve it warm with olive oil, pair it with your favorite soup, or add it to a holiday table. Every slice brings together a delicious balance of sweet, savory, and herbal flavors!