
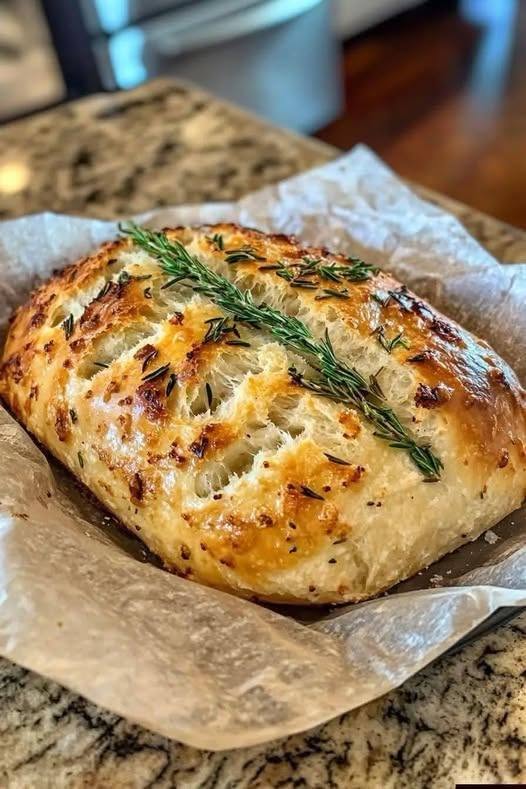
No-Knead Rustic Rosemary Garlic Bread
Description
No-Knead Rustic Rosemary Garlic Bread is a simple homemade bread with a crisp, golden crust and a soft, airy centre filled with the comforting flavours of fresh rosemary and garlic. The best part is that there is no kneading, no complicated equipment, and no special bread-making skills required.
The dough comes together in just a few minutes using basic pantry ingredients. Instead of kneading the dough, you simply mix everything together and allow time to do the work. A long resting period gives the flour and yeast time to develop flavour while creating the beautiful texture that makes rustic bread so delicious.
Fresh rosemary adds an earthy, fragrant flavour, while garlic gives the loaf a savoury aroma that fills the kitchen as it bakes. The finished bread is wonderful served warm with butter, alongside soup or salad, or used for sandwiches and toast.
Ingredients
For the Bread
- 3 cups all-purpose flour
- 1½ teaspoons salt
- 1 teaspoon instant yeast
- 1½ cups warm water
- 2 tablespoons extra-virgin olive oil
- 2 tablespoons fresh rosemary, finely chopped
- 3 cloves of garlic, finely minced
- 1 teaspoon honey or sugar, optional
For Finishing
- 1 tablespoon olive oil
- 1 teaspoon fresh rosemary
- 1 small garlic clove, finely minced
- Flaky sea salt, optional
Instructions
1. Prepare the Garlic and Rosemary
Begin by finely chopping the fresh rosemary. Fresh rosemary works particularly well in this recipe because its fragrant oils are released into the dough during mixing and baking.
Finely mince the garlic. Make sure the pieces are small so the garlic distributes evenly throughout the bread.
For a milder garlic flavour, use two cloves. For a stronger garlic flavour, use four cloves.
2. Mix the Dry Ingredients
In a large mixing bowl, combine the all-purpose flour, salt, and instant yeast.
Stir well so the yeast and salt are distributed throughout the flour.
Add the chopped rosemary and minced garlic and mix again.
3. Add the Wet Ingredients
Pour the warm water and olive oil into the flour mixture.
If using honey or sugar, add it now.
Using a wooden spoon, sturdy spatula, or your hands, mix everything together until a rough, sticky dough forms.
There is no need to knead the dough.
The mixture should look shaggy and somewhat sticky. Do not add a large amount of extra flour just because the dough feels sticky. A wetter dough helps create the rustic, open texture of no-knead bread.
4. Let the Dough Rise
Cover the bowl tightly with plastic wrap, a lid, or a clean kitchen towel.
Leave the dough at room temperature for approximately 8–12 hours.
Overnight is ideal.
As the dough rests, the yeast slowly develops flavour and structure. When ready, the dough should look noticeably larger, bubbly, and airy.
If your kitchen is particularly warm, the dough may rise faster. If your kitchen is cool, it may require additional time.
5. Prepare the Dough for Baking
Lightly flour a clean work surface.
Gently transfer the dough onto the surface.
Sprinkle a little flour over the top if it is very sticky.
Without kneading, gently fold the dough over itself a few times to create a loose round shape.
Avoid pressing out all the air. Those air bubbles help create the rustic texture inside the finished loaf.
Cover the dough loosely and let it rest for approximately 30–45 minutes.
6. Preheat the Oven
Place a Dutch oven with its lid inside the oven.
Preheat the oven to 450°F (230°C).
Allow the Dutch oven to heat for at least 30 minutes.
The hot Dutch oven creates steam around the bread during the first part of baking, helping produce a crisp crust and beautifully developed loaf.
7. Transfer the Dough
Carefully remove the hot Dutch oven from the oven.
Place a piece of parchment paper underneath the dough and carefully lower the dough into the Dutch oven.
Be extremely careful because the Dutch oven and lid will be very hot.
Brush the top of the dough lightly with olive oil.
Sprinkle with fresh rosemary and a little flaky sea salt if desired.
Using a sharp knife or bread lame, make one or two shallow cuts across the top of the dough. This allows the bread to expand as it bakes.
8. Bake Covered
Place the lid on the Dutch oven.
Bake at 450°F for approximately 25–30 minutes.
Keeping the bread covered during this stage traps steam inside the pot. This helps the loaf rise and develop a beautiful crust.
9. Bake Uncovered
Carefully remove the lid.
Continue baking for another 10–15 minutes, or until the bread is deep golden brown and the crust looks crisp.
For a darker crust, allow it to bake for a few additional minutes, watching carefully so the garlic does not burn.
10. Cool Before Slicing
Remove the bread from the Dutch oven and place it on a wire rack.
Allow it to cool for at least 30–60 minutes before slicing.
Although it may be tempting to cut into the loaf immediately, allowing it to cool helps the interior finish setting and prevents the bread from becoming gummy.
Slice with a serrated bread knife and serve.
Notes
The dough should be sticky. Resist the temptation to add too much flour because a wetter dough generally creates a lighter, more rustic crumb.
Instant yeast works especially well because it can be mixed directly into the flour.
If using active dry yeast instead, dissolve it in the warm water first and allow it to sit for approximately 5–10 minutes before mixing.
The water should be warm but not extremely hot. Very hot water can damage the yeast.
Fresh rosemary provides the best flavour, but dried rosemary can be substituted. Use approximately 2 teaspoons dried rosemary instead of the fresh rosemary.
If you want a stronger garlic flavour, add roasted garlic instead of raw minced garlic. Roasted garlic creates a sweeter, milder flavour.
Tips for Perfect No-Knead Bread
Measure Flour Correctly
For the most consistent results, use a kitchen scale if possible. If measuring with cups, spoon the flour into the measuring cup and level it rather than packing it down.
Don’t Rush the First Rise
The long fermentation is one of the secrets to good no-knead bread. Give the dough enough time to become bubbly and airy.
Don’t Overwork the Dough
No-knead bread doesn’t need traditional kneading. Gentle folding is enough.
Use a Dutch Oven.
A heavy Dutch oven with a tight-fitting lid is ideal because it traps steam around the loaf. If you don’t have one, the bread can still be baked on a heavy baking sheet, but the crust may be different.
Preheat the Pot
Putting the dough into a properly heated Dutch oven helps the crust begin forming immediately.
Don’t Slice Too Soon
Allow the loaf to cool before slicing. This gives the interior time to set and creates a better crumb.
Watch the Garlic
Garlic exposed directly on the surface can brown quickly. If you notice the garlic becoming too dark, reduce the oven temperature slightly during the uncovered portion of baking.
Variations
Parmesan Rosemary Garlic Bread
Add ½ cup finely grated Parmesan cheese to the dough for a richer, savoury loaf.
Roasted Garlic Bread
Replace the raw garlic with ½ cup mashed roasted garlic cloves. This gives the bread a sweet and mellow garlic flavour.
Garlic Herb Bread
Add chopped parsley, thyme, oregano, or basil along with the rosemary.
Cheesy Garlic Bread
Add ½ cup shredded mozzarella or sharp cheddar to the dough.
Lemon Rosemary Bread
Add 1 teaspoon of finely grated lemon zest along with the rosemary for a bright flavour.
Spicy Garlic Bread
Add ¼–½ teaspoon crushed red pepper flakes for a gentle spicy kick.
Servings
Makes 1 rustic loaf.
Approximately 8–10 servings, depending on slice size.
Nutritional Information
Approximate nutrition per serving, based on 10 servings:
Calories: 180–200
Protein: 4–5 g
Carbohydrates: 30–33 g
Dietary Fibre: 1–2 g
Sugar: 1 g
Fat: 5–6 g
Saturated Fat: Less than 1 g
Sodium: 300–350 mg
Nutritional values are estimates and will vary depending on the exact ingredients and serving size.
Benefits
Simple Ingredients
This bread is made with basic ingredients that are commonly found in the pantry, making it an easy alternative to store-bought artisan bread.
No Kneading Required
The long fermentation process develops the dough without requiring traditional kneading.
Fresh Homemade Bread
Homemade bread allows you to control the ingredients and avoid unnecessary preservatives commonly found in some packaged breads.
Rosemary Adds Flavour
Fresh rosemary provides a fragrant herbal flavour that makes the bread delicious without needing a complicated recipe.
Garlic Adds Aroma
Garlic gives the loaf a savoury aroma and rich flavour that pairs beautifully with soups, salads, roasted vegetables, and main dishes.
Versatile
The bread can be served as a side, used for sandwiches, toasted for breakfast, or turned into garlic toast.
Frequently Asked Questions
Why is my no-knead dough so sticky?
Sticky dough is normal. No-knead bread typically uses a relatively wet dough. If it is extremely difficult to handle, lightly flour your hands and work surface rather than adding large amounts of flour.
Can I let the dough rise overnight?
Yes. Overnight fermentation is one of the easiest ways to make this recipe. Cover the bowl and leave it at room temperature for approximately 8–12 hours.
Can I use whole wheat flour?
Yes. You can replace part of the all-purpose flour with whole wheat flour. Start by replacing about 1 cup of all-purpose flour with whole wheat flour. The bread will be denser and have a more hearty flavour.
Can I use bread flour?
Yes. Bread flour works very well and can create a slightly chewier loaf.
Can I use dried rosemary?
Yes. Substitute approximately 2 teaspoons dried rosemary for the fresh rosemary.
Can I use garlic powder?
Yes, although fresh garlic provides better flavour. Use about 1 teaspoon garlic powder if you don’t have fresh garlic.
Do I need a Dutch oven?
A Dutch oven is highly recommended because it creates a steam-filled environment that helps produce the classic crisp crust. However, the bread can be baked without one using a heavy baking sheet and a separate source of steam.
How do I know when the bread is done?
The loaf should have a deep golden-brown crust and sound hollow when tapped on the bottom. If using an instant-read thermometer, the internal temperature should generally be around 200–210°F (93–99°C).
Why did my bread turn out dense?
A dense loaf can result from insufficient rising time, old yeast, too much flour, or dough that was overworked. Make sure the dough becomes visibly bubbly and expanded before shaping.
How should I store the bread?
Once completely cool, store the bread in a paper bag or loosely wrapped at room temperature for up to 2 days. Avoid storing freshly baked bread in the refrigerator because refrigeration can make it stale faster.
Can I freeze the bread?
Yes. Once completely cooled, slice the loaf and place the slices in a freezer-safe bag or container. Freeze for up to about 2–3 months. Thaw at room temperature and warm in the oven or toaster before serving.
What should I serve with rosemary garlic bread?
It pairs beautifully with soups, stews, pasta, salads, roasted chicken, grilled vegetables, seafood, and creamy dips. It is also delicious simply toasted with butter or olive oil.
Final Thoughts
No-Knead Rustic Rosemary Garlic Bread is one of the easiest ways to make bakery-style bread at home. There is no complicated kneading process and no need for special bread-making skills. A simple mixture of flour, yeast, water, olive oil, garlic, and rosemary transforms into a beautiful rustic loaf with a crisp golden crust and soft, flavorful center.